It is unnecessary to install WordPress manually as it can be quickly installed via Softaculous; however, if you want a more technical option, this article will cover the steps needed to install WordPress manually.
Table of Contents
What is WordPress
WordPress is a popular open-source content management system (CMS) primarily used for building websites and blogs. It provides a user-friendly interface for creating, managing, and updating website content without requiring extensive technical knowledge. Originally developed as a blogging platform, WordPress has evolved into a versatile tool used to create various types of websites, including e-commerce sites, portfolios, business websites, forums, and more.
WordPress offers a wide range of themes and plugins, allowing users to customize the appearance and functionality of their websites according to their specific needs. Themes control the overall design and layout, while plugins add features and extend the functionality of the site.
One of the key advantages of WordPress is its large and active community of users and developers, which contribute to its ongoing development, provide support, and create an extensive ecosystem of themes and plugins.
Overall, WordPress is widely recognized for its flexibility, scalability, and ease of use, making it a popular choice for individuals, businesses, and organizations of all sizes to establish their online presence.
Steps for installing WordPress manually
Installing WordPress manually involves several steps. Here’s a general outline of the process:
Download WordPress
Visit the official WordPress website (https://wordpress.org/download/) and download the latest version of WordPress.
Prepare Hosting Environment
- Choose a web hosting provider that meets the WordPress requirements (PHP version 7.4 or greater, MySQL version 5.6 or greater, etc.).
- Create a MySQL database and user for WordPress.
Upload WordPress Files
- Extract the downloaded WordPress zip file on your computer.
- Using an FTP client like FileZilla, connect to your web hosting server.
- Upload the extracted WordPress files to the root directory of your website (usually the public_html folder)
Configure wp-config.php
- Rename the file wp-config-sample.php to wp-config.php.
- Open wp-config.php in a text editor.
- Enter your database details (database name, username, password, and host) in the appropriate sections.
Run the Installation Script
- Open your web browser and navigate to your website’s URL (e.g., http://www.yourwebsite.com).
- You should see the WordPress installation page.
- Select your language and click on the “Continue” button.
- WordPress will ask for your database information. Enter the details you configured in the wp-config.php file.
- Click on the “Run the installation” button.
Complete Installation
- Enter your site title, username, password, and email address.
- Optionally, you can check the “Discourage search engines from indexing this site” box if you don’t want search engines to index your site while you’re still setting it up.
- Click on the “Install WordPress” button.
- After installation, you’ll see a success message. You can then log in to your WordPress dashboard using the username and password you provided.
Customize and Configure
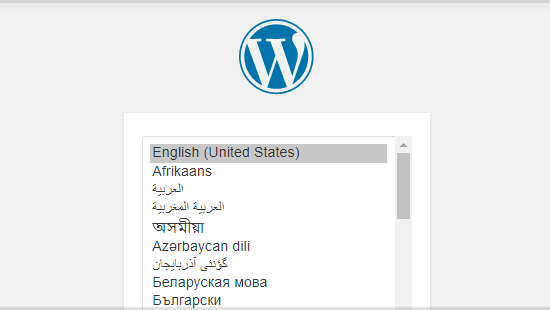
- Once you access your correct WordPress URL in a browser, you will see a WordPress setup page prompting you to select your preferred language. Select your preferred language and click the Continue button.
- You should now see a welcome page that says, “Welcome to the famous five-minute WordPress installation process!” Under the Information needed section, you’ll need to fill out the following fields:
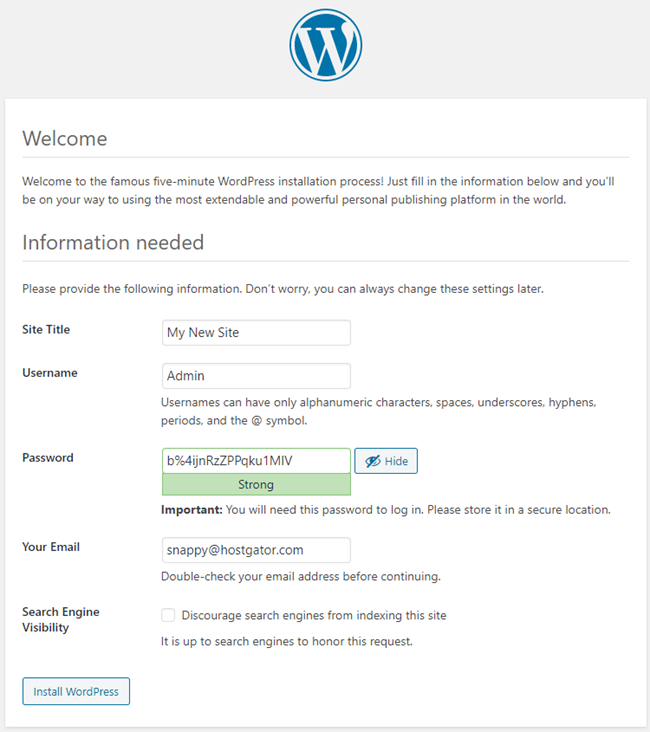
- Site Title – This can be changed at a later time.
- Username – This is the admin username for the site. We highly recommend using something other than ‘admin’ since using it can pose a security risk.
- Password– A strong password will be automatically generated for you, but you can choose your own. The strength indicator will let you know how secure your password is.
- Your Email– Login information will be sent to this email address, so make sure it is an email address you have access to.
- Search Engine Visibility– If you want your website to show up in search engine results, leave this unchecked. If you do not want your site indexed, then you can check this box.
- Click the Install WordPress button, and you should be taken to the final screen, which says, “WordPress has been installed. Thank you, and enjoy!”. It will display the username you chose on the previous page and a placeholder for your password. Click the Log In button to log in to the WordPress Admin Dashboard to begin building your site!